- Products

- Developers
- User stories
- Blog
- Pricing

How to build a "who's typing" feature with Laravel and Pusher
In this tutorial, you will learn how to build who's typing feature for your chat app with Laravel and Pusher.
Introduction
In this tutorial, I will show you how to build a ‘who’s typing’ feature with Laravel and Pusher, using the concept of a chat app to demonstrate it. When you’re using a chat app, having a ‘who’s typing’ feature really improves the user experience and makes it easier for users to interact with the application. If you’re chatting with someone, you can easily see when the other person is responding to your chats, saving you time from typing ‘you there?’ and letting you know when to wait for the other person’s response, so you don’t keep sending messages.
Note that this tutorial focuses on the ‘who’s typing’ part of the app (if you want to learn how to build a chat app using Laravel and Pusher, you should read this tutorial)
Let’s take a quick look at what we’ll be building:
The code of the completed demo is available on GitHub.
Setting Up Laravel
Create a new Laravel project. (I prefer using the Laravel installer) Open your terminal and run the code below:
1laravel new laravel-whos-typing
Next, we need to setup our new Laravel project. First, we need to register the App\Providers\BroadcastServiceProvider. Open config/app.php and uncomment App\Providers\BroadcastServiceProvider in the providers array.
We then need to tell Laravel that we are using the Pusher driver in the .env file:
1// .env 2 3BROADCAST_DRIVER=pusher
Since we specified we want to use Pusher as our broadcasting driver, we need to install the Pusher PHP SDK:
1composer require pusher/pusher-php-server
Setting Up Pusher
If you don’t have one already, create a free Pusher account at https://pusher.com/signup then log in to your dashboard and create an app. Take note of your app credentials as we’ll be using them shortly.
Now, let’s fill in our Pusher app credentials. If you open the config/broadcasting.php, you’ll notice that Laravel is pulling some of the Pusher credentials from the .env file. So let’s update the .env file to contain our Pusher app credentials:
1// .env 2 3PUSHER_APP_ID=xxxxxx 4PUSHER_APP_KEY=xxxxxxxxxxxxxxxxxxxx 5PUSHER_APP_SECRET=xxxxxxxxxxxxxxxxxxxx
Remember to replace the xs with your Pusher app credentials. You can find your app credentials under the Keys section on the Overview tab in the Pusher Dashboard.
Also, remember to fill in the cluster of your Pusher app and other additional options:
1// config/broadcasting.php 2 3'options' => [ 4 'cluster' => 'eu', 5 'encrypted' => true 6],
Installing Frontend Dependencies
For this tutorial, we’ll be using Bootstrap, Vue and Axios, which have been setup for us by Laravel, though we still need to install each of the dependencies. To compile our CSS and JavaScript, we need to install Laravel Mix, which is a wrapper around Webpack. We can install these dependencies through NPM:
1npm install
We also need to install Laravel Echo, which is a JavaScript library that makes it painless to subscribe to channels and listen for events broadcast by Laravel and of course the Pusher JavaScript library:
1npm install --save laravel-echo pusher-js
Once installed, we need to tell Laravel Echo to use Pusher. At the bottom of the resources/assets/js/bootstrap.js file, uncomment the Laravel Echo section and update the details with:
1// resources/assets/js/bootstrap.js 2 3import Echo from "laravel-echo" 4 5window.Echo = new Echo({ 6 broadcaster: 'pusher', 7 key: Laravel.pusherKey, 8 cluster: 'eu', 9 encrypted: true 10});
Since we specified our Pusher app credentials in the .env file, notice Laravel.pusherKey from the code above, we’ll load our Pusher app key from the config instead of hard coding it directly in resources/assets/js/bootstrap.js. We’ll define Laravel.pusherKey in a later section.
Also use the same cluster that you specified earlier in config/broadcasting.php.
With the setups done, let’s start implementing a ‘who’s typing’ feature in our Laravel application.
To do this, we need to know when a user is typing into the chat box. There are different ways to accomplish this, but in this tutorial, we’ll add event listeners to the chat box. With this, we can know when a user is actually typing a message and display the typing indicator to the appropriate users.
We’ll make use of JavaScript keyboard events: onkeydown which fires event when a user is pressing a key. This means that when a user presses a key, we send events to Pusher. These types of events are called client events and do not hit the server at all. But how do we broadcast such events to Pusher since they are a bit different from the normal events (server to Pusher events)? Well, Pusher is aware of such events and has a special way of handling them.
By default, when you create a Pusher app, client events are not enabled. We have to enable this for our app. To enable client events in your Pusher app, select the app then click on the App Settings tab and then check the box next to Enable client events.
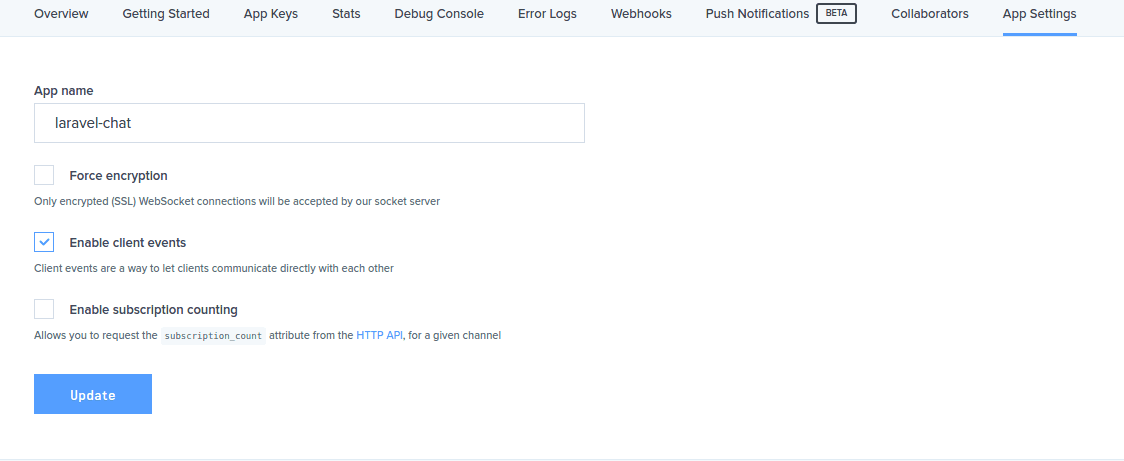
Once we have enabled client events in our Pusher app, we can now trigger and listen for client events in our chat app.
Authenticating Users
Our chat app will require users to be logged in before they can begin to chat. So, we need an authentication system:
1php artisan make:auth
This will create the necessary routes, views and controllers needed for an authentication system.
Before we go on to create users, we need to run the users migration that comes with a fresh installation of Laravel. But to do this, we first need to setup our database. Open the .env file and enter your database details:
1// .env 2 3DB_CONNECTION=mysql 4DB_HOST=127.0.0.1 5DB_PORT=3306 6DB_DATABASE=laravel-chat 7DB_USERNAME=root 8DB_PASSWORD=root
Update with your own database details. Now, we can run our migration:
1php artisan migrate
Note: There’s a bug in Laravel 5.4 if you’re running a version of MySQL older than 5.7.7 or MariaDB older than 10.2.2. More info here. This can be fixed by replacing the boot() of app/Providers/AppServiceProvider.php with:
1// app/Providers/AppServiceProvider.php 2 3// remember to use 4Illuminate\Support\Facades\Schema; 5 6/** 7 * Bootstrap any application services. 8 * 9 * @return void 10 */ 11public function boot() 12{ 13 Schema::defaultStringLength(191); 14}
Defining App Routes
Open routes/web.php and replace the routes with the code below:
1// routes/web.php 2 3Auth::routes(); 4 5Route::get('/', function () { 6 return view('chat'); 7})->middleware('auth');
The routes are pretty simple: a route that will handle authentication and a route to the homepage that will render a chat view which we’ll create shortly.
NOTE: Since we have removed the /home route, you might want to update the redirectTo property of both app/Http/Controllers/Auth/LoginController.php and app/Http/Controllers/Auth/RegisterController.php to:
1protected $redirectTo = '/';
Creating The Chat App View
Create a new resources/views/chat.blade.php file and paste into it:
1// resources/views/chat.blade.php 2 3@extends('layouts.app') 4 5@section('content') 6<div class="container"> 7 <div class="row"> 8 <div class="col-md-8 col-md-offset-2"> 9 <div class="panel panel-default"> 10 <div class="panel-heading">Chats</div> 11 12 <div class="panel-body"> 13 <ul> 14 <li v-for="message in messages"> 15 @{{ message.user.name }} - @{{ message.message }} 16 </li> 17 </ul> 18 <div> 19 <div class="input-group"> 20 <input type="text" name="message" class="form-control" placeholder="Type your message here..." v-model="newMessage" @keyup.enter="sendMessage"> 21 <span class="input-group-btn"> 22 <button class="btn btn-primary" @click="sendMessage"> 23 Send 24 </button> 25 </span> 26 </div> 27 <span v-show="typing" class="help-block" style="font-style: italic;"> 28 @{{ user }} is typing... 29 </span> 30 </div> 31 </div> 32 </div> 33 </div> 34 </div> 35</div> 36@endsection
Once again pretty straightforward, we are using Vue here. We loop through each of the messages and display them. Next, there is a input field and a send button for composing chat messages. The input field is binded to the newMessage data. When the send button is clicked or the enter key is pressed on the input field, a sendMessage() is called. Lastly, there is span holding the ‘is typing’ indicator. This will be hidden by default and will be displayed using Vue’s v-show when typing is true (that is when a user is typing).
Notice that we are displaying the name of the user along with the ‘is typing’ indicator, we need a way to pass the authenticated user to our JavaScript file. Remember from resources/assets/js/bootstrap.js, where we used Laravel.pusherKey, we also need to pass Pusher app key to our JavaScript file. We can do this by updating the “ section in resources/views/layouts/app.blade.php (which was created when we ran make:auth) with:
1resources/views/layouts/app.blade.php 2 3<!-- Scripts --> 4<script> 5 window.Laravel = {!! json_encode([ 'csrfToken' => csrf_token(), 'user' => Auth::user(), 'pusherKey' => config('broadcasting.connections.pusher.key'), ]) !!}; 6</script>
The code above creates a Laravel object on the global window, we then add some items to the object. The user item will be the currently authenticated user and the pusherKey item will load our Pusher app key from the config/broadcasting.php config file.
Laravel has integrated Vue and Axios for us, so we can start using Vue without any further setup. There is an app.jsfile that Laravel creates by default within resources/assets/js/app.js. Open this file and update with the code below:
1// resources/assets/js/app.js 2 3require('./bootstrap'); 4 5const app = new Vue({ 6 el: '#app', 7 8 data: { 9 messages: [], 10 newMessage: '', 11 user: '', 12 typing: false 13 }, 14 15 methods: { 16 sendMessage() { 17 // add new message to messages array 18 this.messages.push({ 19 user: Laravel.user, 20 message: this.newMessage 21 }); 22 23 // clear input field 24 this.newMessage = ''; 25 26 // persist to database 27 } 28 } 29});
First, we require the resources/assets/js/bootsrap.js file that contains our package setups and integrations. Next, we create a new Vue instance and bind it to app id. We then create some data variables: messages array will hold our chat messages, newMessage will be the new message that a user sends, user will be the currently authenticated user and finally typing will hold true or false indicating whether a user is typing or not.
Next we define a sendMessage() that simply adds the new message along with the user that sent it to the messages array and finally clears the input field. (If you are building an actual chat app, you might want to do an AJAX request to persist the new message to the database here.)
Having done this, we can start sending messages and our messages will be displayed on the chat view. Now let’s move on to the meat of this tutorial; adding ‘who’s typing’ to our Laravel application.
Laravel Echo provides some handy methods to integrate with client events which we’ll be using to implement our ‘who’s typing’ indicator.
Paste the code below into the resources/assets/js/app.js within the methods object:
1// resources/assets/js/app.js 2 3isTyping() { 4 let channel = Echo.private('chat'); 5 6 setTimeout(function() { 7 channel.whisper('typing', { 8 user: Laravel.user, 9 typing: true 10 }); 11 }, 300); 12},
The isTyping() will be triggered when an onkeydown event is fired within the chat input field (that is, when a user is typing a message). First, we subscribe to a private channel called chat and trigger a client event using Laravel Echo’s whisper() after 0.3s. The whisper() accepts the name of the client event, in our case typing and the data we want to broadcast. Since Pusher specifies that client events must be prefixed by client-, Laravel is smart enough to prefix the client- for us under the hood. We pass the user that is typing a message and typing as true as the data we are broadcasting.
Note: Client events can only be triggered on private and presence channels because they require authentication. Also, client events are not delivered to the originator of the event. For more information on client events, kindly checkout the Pusher documentation.
Since we created a private channel, only authenticated users will be able to listen on the chat channel. We need a way to authorize that the currently authenticated user can actually listen on the channel. This can be done by in the routes/channels.php file:
1// routes/channels.php 2 3Broadcast::channel('chat', function ($user) { 4 return Auth::check(); 5});
We pass to the channel(), the name of our channel and a callback function that will either return true or false depending on whether the current user is authenticated.
Now that we can trigger client events, we also need a way to listen for the client events in our application. To do this, add the code below to resources/assets/js/app.js just after the data object:
1// resources/assets/js/app.js 2 3created() { 4 let _this = this; 5 6 Echo.private('chat') 7 .listenForWhisper('typing', (e) => { 8 this.user = e.user; 9 this.typing = e.typing; 10 11 // remove is typing indicator after 0.9s 12 setTimeout(function() { 13 _this.typing = false 14 }, 900); 15 }); 16},
Again we subscribe to the chat channel. To listen for client events, we use the listenForWhisper() and set both the user and typing data accordingly. Lastly, we remove the is typing indicator after 0.9s of a user not typing.
Before we start testing the who’s typing feature, let update the input field of the chat view with:
1// resources/view/chat.blade.php 2 3<input type="text" name="message" class="form-control" placeholder="Type your message here..." v-model="newMessage" @keydown="isTyping" @keyup="notTyping" @keyup.enter="sendMessage">
We added two keyboard events: @keydown and @keyup which are Vue equivalent of the JavaScript keyboard events we talked about earlier. On keydown, the isTyping() will be triggered and on keyup, the notyping() will be triggered.
We can now compile the JavaScript files using Laravel Mix using:
1npm run dev
Now we can start our chat app by running:
1php artisan serve
Conclusion
With such a basic app, we have seen how to implement a ‘who’s typing’ feature in a Laravel application using Pusher. I hope you find this tutorial helpful and if you encounter any problems following this tutorial, kindly drop a comment below and we’d tackle them together.


© 2026 Pusher Ltd. All rights reserved.
Pusher Limited is a company registered in England and Wales (No. 07489873) whose registered office is at MessageBird UK Limited, 3 More London Riverside, 4th Floor, London, United Kingdom, SE1 2AQ.