- Products

- Developers
- User stories
- Blog
- Pricing

Build a live comments feed with Go and Vue.js
Introduction
The internet is a breeding ground for all kinds of social activities because it expands the possibilities of communication. In order to keep web applications social and enjoyable, it is important for them to have one or more interfaces for the users to interact through. One such interface is the comment section.
The comment section is where users can discuss a subject (post, video, picture) that they have access to. In the past, for a user to see a comment from another user, the user would have to refresh the browser window. However, with realtime comments now we can automatically pull in comments live. This article will cover how we can build realtime commenting using Pusher.
By the end of this article, we will have built an application that looks like this:
Requirements
To follow along with this article, you will need the following:
- Go (version >= 0.10.x) installed on your computer. Heres how you can install Go.
- SQLite (v3.x) installed on your machine. Installation guide.
- Basic knowledge of the Go programming language.
- Basic knowledge of JavaScript (ES6).
- Basic knowledge of Vue.js.
Getting a Pusher Channels application
The first step will be to get a Pusher Channels application. We will need the application credentials for our realtime features to work.
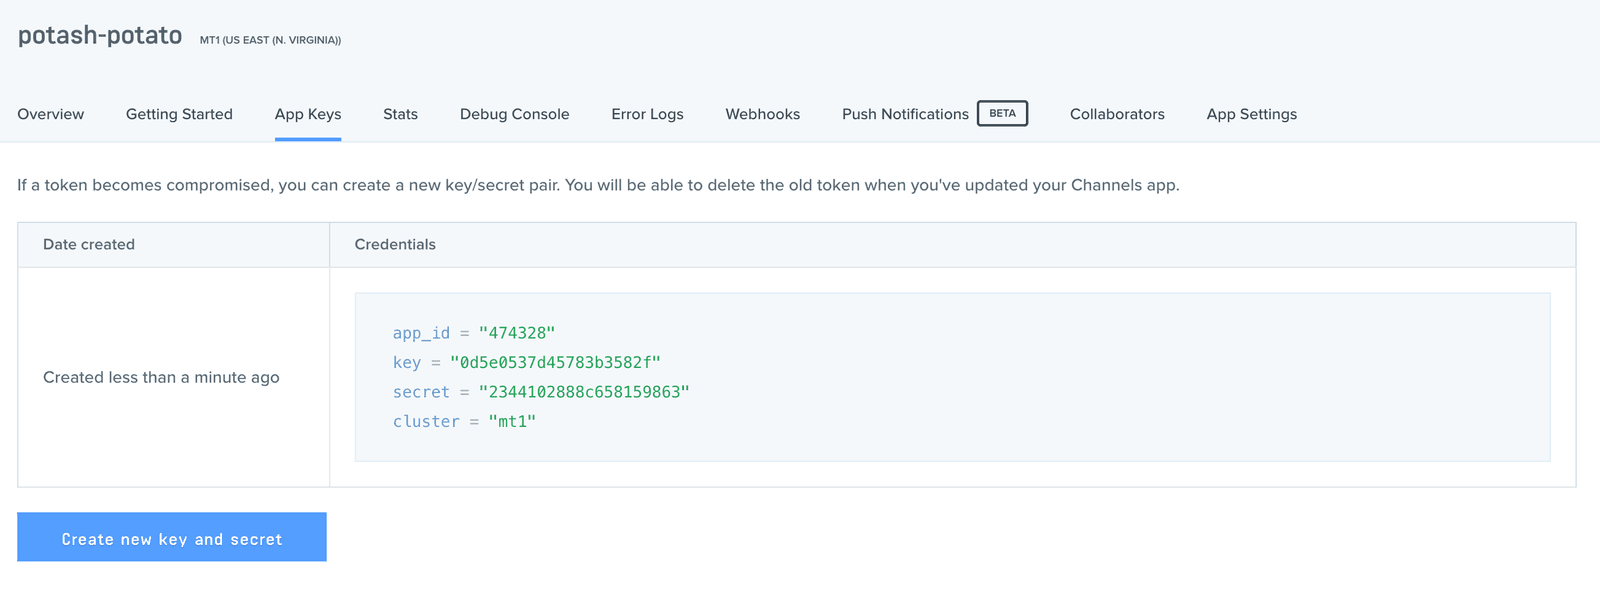
Go to the Pusher website and create an account. After creating an account, you should create a new application. Follow the application creation wizard and then you should be given your application credentials, we will use this later in the article.
Now that we have our application, let’s move on to the next step.
Setting up the codebase
Let’s start by navigating into the src directory located in the $GOPATH. Then we’ll create a new directory for our app there.
1$ cd $GOPATH/src 2 $ mkdir go-realtime-comments 3 $ cd go-realtime-comments
Create a comments.go file in this directory.
Before we write code, we need to import a few Go packages that will help run our projects. We will install the Echo framework and the SQLite packages. Run the following commands to pull in the packages:
1$ go get github.com/labstack/echo 2 $ go get github.com/labstack/echo/middleware 3 $ go get github.com/mattn/go-sqlite3
⚠️ If you use Windows and you encounter the error ‘cc.exe: sorry, unimplemented: 64-bit mode not compiled in ‘, then you need a Windows gcc port, such as https://sourceforge.net/projects/mingw-w64/. Also see this GitHub issue.
With your favorite editor, open the comments.go file and paste in the following lines of code:
1package main 2 3 import ( 4 // "database/sql" 5 6 "github.com/labstack/echo" 7 "github.com/labstack/echo/middleware" 8 // _ "github.com/mattn/go-sqlite3" 9 )
Configuring the database and routes
Every Go application must have a main function. This is where the execution of the application will start from, so let’s create our main function:
In the comments.go file, add the following below the imports:
1func main() { 2 3 // Echo instance 4 e := echo.New() 5 6 // Middleware 7 e.Use(middleware.Logger()) 8 e.Use(middleware.Recover()) 9 10 // Define the HTTP routes 11 e.GET("/comments", func(c echo.Context) error { 12 return c.JSON(200, "GET Comments") 13 }) 14 15 e.POST("/comment", func(c echo.Context) error { 16 return c.JSON(200, "POST a new Comment") 17 }) 18 19 // Start server 20 e.Logger.Fatal(e.Start(":9000")) 21 }
In the main function, we have defined some basic route handler functions, these functions basically return hard coded text to browser on request. The last line will start Go’s standard HTTP server using Echo’s start method and listen for requests port 9000.
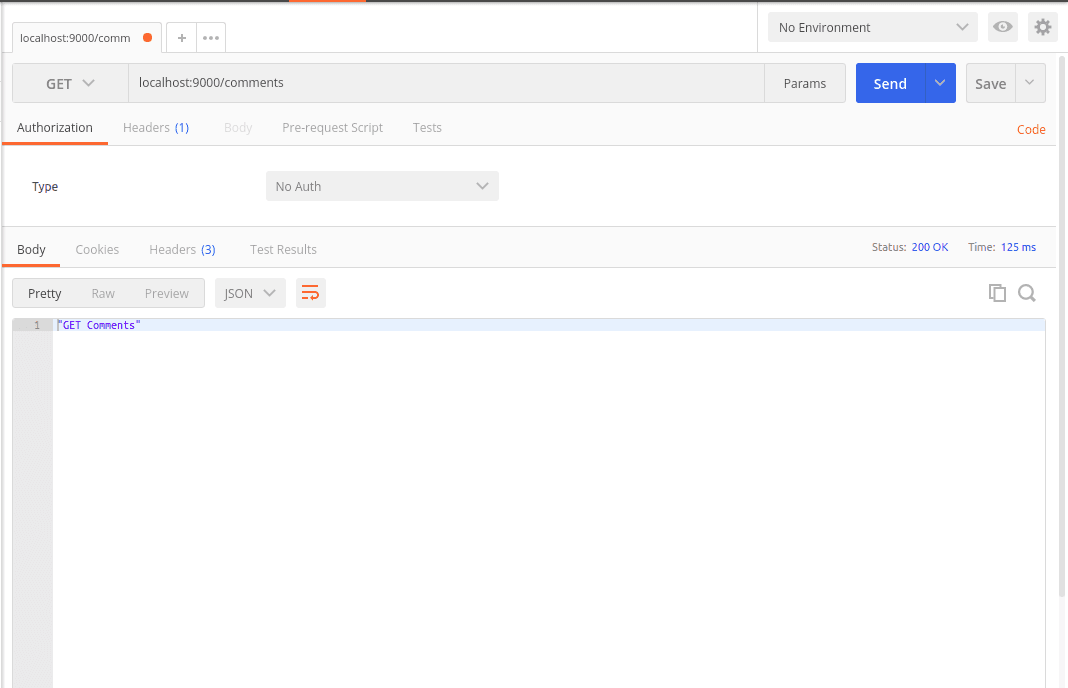
We can test that the application works at this stage by running it and making some requests using Postman.
Here is how you can run the application:
$ go run ./comments.go
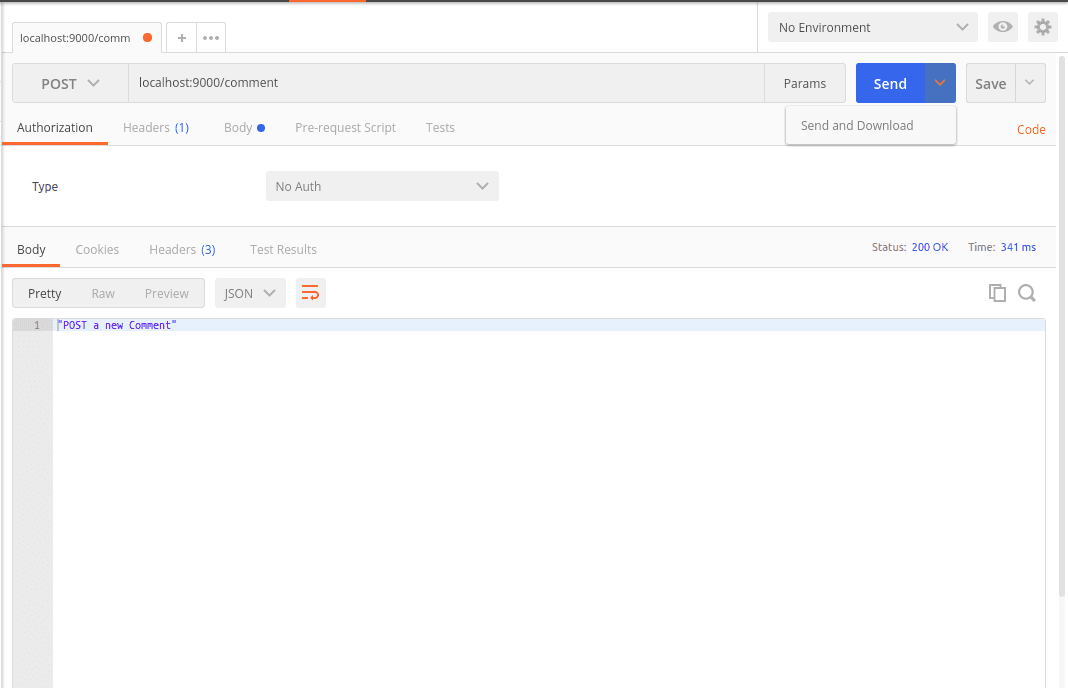
We can send HTTP requests using Postman. Here’s a sample GET request using Postman:
POST request with Postman:
We will create a function that will initialize a database and for that we need the SQL and SQLite3 drivers. We already added them to the import statement so uncomment them. We will also create a function that will migrate the database using a database schema defined inside the function.
Open the comments.go file and paste the following code before the main function:
1func initDB(filepath string) *sql.DB { 2 db, err := sql.Open("sqlite3", filepath) 3 if err != nil { 4 panic(err) 5 } 6 7 if db == nil { 8 panic("db nil") 9 } 10 return db 11 } 12 13 func migrate(db *sql.DB) { 14 sql := ` 15 CREATE TABLE IF NOT EXISTS comments( 16 id INTEGER NOT NULL PRIMARY KEY AUTOINCREMENT, 17 name VARCHAR NOT NULL, 18 email VARCHAR NOT NULL, 19 comment VARCHAR NOT NULL 20 ); 21 ` 22 _, err := db.Exec(sql) 23 if err != nil { 24 panic(err) 25 } 26 }
Next add the following code to the top of the main function:
1// [...] 2 3 // Initialize the database 4 db := initDB("storage.db") 5 migrate(db) 6 7 // [...]
We can now check that these functions are being called and the database is created during execution by running the application:
go run comments.go
⚠️ If you were already running the Go application you would need to kill the process using ctrl+c on your keyboard and then restart it to see changes.
When the application is run for the first time, a storage.db file will be created in the working directory if it did not previously exist.
Setting up the handlers
We have tested that our application listens on the specified port 9000 and handles the HTTP requests as we configured it to. However, the current handler functions simply return hard-coded text to the browser so let’s create new handler functions to handle responses to the routes.
Create a new folder in the root directory named handlers:
1$ mkdir handlers 2 $ cd handlers
Next create a handlers.go file and paste the following:
1package handlers 2 3 import ( 4 "database/sql" 5 "go-realtime-comments/models" 6 "net/http" 7 "github.com/labstack/echo" 8 )
Now we need to go back to the comments.go file and import the handlers package:
1import ( 2 "go-realtime-comments/handlers" 3 4 // [...] 5 )
In the same file, replace the route definitions from earlier with the ones below:
1// [...] 2 3 // Define the HTTP routes 4 e.File("/", "public/index.html") 5 e.GET("/comments", handlers.GetComments(db)) 6 e.POST("/comment", handlers.PushComment(db)) 7 8 // [...]
Next paste the following code in the handlers.go file below the import statement:
1type H map[string]interface{} 2 3 //GetComments handles the HTTP request that hits the /comments endpoint 4 func GetComments(db *sql.DB) echo.HandlerFunc { 5 return func(c echo.Context) error { 6 return c.JSON(http.StatusOK, models.GetComments(db)) 7 } 8 } 9 10 func PushComment(db *sql.DB) echo.HandlerFunc { 11 return func(c echo.Context) error { 12 var comment models.Comment 13 14 c.Bind(&comment) 15 16 id, err := models.PushComment(db, comment.Name, comment.Email, comment.Comment) 17 if err == nil { 18 return c.JSON(http.StatusCreated, H{ 19 "created": id, 20 }) 21 } 22 23 return err 24 } 25 }
The GetComments function fetches and returns comments from the database while the PushComment saves comments to the database and returns a response.
Setting up the models
To create the model package, we need to create a new folder in the root directory of our application:
1$ mkdir models 2 $ cd models
Next create a models.go file and paste the following code:
1package models 2 3 import ( 4 "database/sql" 5 _ "github.com/mattn/go-sqlite3" 6 )
Let’s create a Comment type, which is a struct with four fields:
ID- the ID of the comment.Name- the username of the user who made the comment.Email- the email of the user who made the comment.Comment- the comment.
In Go, we can add metadata to variables by putting them within backticks. We can use this to define what each field should look like when converted to JSON. This will also help the c.Bind function know how to map JSON data when registering a new comment.
Let’s define the structs for Comment and CommentCollection. In the models.go file paste in the following below the imports:
1type Comment struct { 2 ID int `json:"id"` 3 Name string `json:"name"` 4 Email string `json:"email"` 5 Comment string `json:"comment"` 6 } 7 8 type CommentCollection struct { 9 Comments []Comment `json:"items"` 10 }
Next, paste in the following code after the structs:
1func GetComments(db *sql.DB) CommentCollection { 2 sql := "SELECT * FROM comments" 3 rows, err := db.Query(sql) 4 5 if err != nil { 6 panic(err) 7 } 8 9 defer rows.Close() 10 11 result := CommentCollection{} 12 13 for rows.Next() { 14 15 comment := Comment{} 16 err2 := rows.Scan(&comment.ID, &comment.Name, &comment.Email, &comment.Comment) 17 if err2 != nil { 18 panic(err2) 19 } 20 21 result.Comments = append(result.Comments, comment) 22 } 23 24 return result 25 }
The GetComments function is responsible for retrieving all the available comments from the database and returning them as an instance of the CommentCollection that we defined.
Next, paste in the following code below the one above:
1func PushComment(db *sql.DB, name string, email string, comment string) (int64, error) { 2 sql := "INSERT INTO comments(name, email, comment) VALUES(?, ?, ?)" 3 stmt, err := db.Prepare(sql) 4 if err != nil { 5 panic(err) 6 } 7 8 defer stmt.Close() 9 10 result, err2 := stmt.Exec(name, email, comment) 11 if err2 != nil { 12 panic(err2) 13 } 14 15 return result.LastInsertId() 16 }
The PushComments function adds a new comment to the database.
Building the frontend
Next, create a public folder in our application’s root directory and create an index.html file inside it.
Open the index.html file and paste in this code:
1<!DOCTYPE html> 2 <html lang="en"> 3 <head> 4 <meta charset="UTF-8"> 5 <meta name="viewport" content="width=device-width, initial-scale=1.0"> 6 <meta http-equiv="X-UA-Compatible" content="ie=edge"> 7 <link rel="stylesheet" href="https://maxcdn.bootstrapcdn.com/bootstrap/4.0.0-beta.2/css/bootstrap.min.css" integrity="sha384-PsH8R72JQ3SOdhVi3uxftmaW6Vc51MKb0q5P2rRUpPvrszuE4W1povHYgTpBfshb" crossorigin="anonymous"> 8 <title>Realtime comments</title> 9 <script src="https://unpkg.com/axios/dist/axios.min.js"></script> 10 <script src="https://cdn.jsdelivr.net/npm/vue@2.5.16/dist/vue.js"></script> 11 <style> 12 @media (min-width: 48em) { 13 html { 14 font-size: 18px; 15 } 16 } 17 body { 18 font-family: Georgia, "Times New Roman", Times, serif; 19 color: #555; 20 } 21 h1, .h1, h2, .h2, h3, .h3, h4, .h4, h5, .h5, h6, .h6 { 22 font-family: "Helvetica Neue", Helvetica, Arial, sans-serif; 23 font-weight: 400; 24 color: #333; 25 } 26 .blog-masthead { 27 margin-bottom: 3rem; 28 background-color: #428bca; 29 box-shadow: inset 0 -.1rem .25rem rgba(0,0,0,.1); 30 } 31 .nav-link { 32 position: relative; 33 padding: 1rem; 34 font-weight: 500; 35 color: #cdddeb; 36 } 37 .nav-link:hover, .nav-link:focus { 38 color: #fff; 39 background-color: transparent; 40 } 41 .nav-link.active { 42 color: #fff; 43 } 44 .nav-link.active::after { 45 position: absolute; 46 bottom: 0; 47 left: 50%; 48 width: 0; 49 height: 0; 50 margin-left: -.3rem; 51 vertical-align: middle; 52 content: ""; 53 border-right: .3rem solid transparent; 54 border-bottom: .3rem solid; 55 border-left: .3rem solid transparent; 56 } 57 @media (min-width: 40em) { 58 .blog-title { 59 font-size: 3.5rem; 60 } 61 } 62 .sidebar-module { 63 padding: 1rem; 64 } 65 .sidebar-module-inset { 66 padding: 1rem; 67 background-color: #f5f5f5; 68 border-radius: .25rem; 69 } 70 .sidebar-module-inset p:last-child, 71 .sidebar-module-inset ul:last-child, 72 .sidebar-module-inset ol:last-child { 73 margin-bottom: 0; 74 } 75 .blog-post { 76 margin-bottom: 4rem; 77 } 78 .blog-post-title { 79 margin-bottom: .25rem; 80 font-size: 2.5rem; 81 text-align: center; 82 } 83 .blog-post-meta { 84 margin-bottom: 1.25rem; 85 color: #999; 86 text-align: center; 87 } 88 .blog-footer { 89 padding: 2.5rem 0; 90 color: #999; 91 text-align: center; 92 background-color: #f9f9f9; 93 border-top: .05rem solid #e5e5e5; 94 } 95 .blog-footer p:last-child { 96 margin-bottom: 0; 97 } 98 input{ 99 width: 45% !important; 100 display: inline-block !important; 101 } 102 textarea { 103 width: 90%; 104 height: 150px; 105 padding: 12px 20px; 106 box-sizing: border-box; 107 border: 2px solid #ccc; 108 border-radius: 4px; 109 background-color: #f8f8f8; 110 resize: none; 111 } 112 textarea:focus, input:focus{ 113 outline: none !important; 114 } 115 #comment-section{ 116 background: rgb(178, 191, 214); 117 padding: 0.5em 2em; width: 90%; 118 margin: 10px 0; 119 border-radius: 15px; 120 } 121 #comment-section > div > p { 122 color: black; 123 display:inline; 124 } 125 img{ 126 border-radius: 50%; 127 float: left; 128 } 129 </style> 130 </head> 131 <body> 132 <div id="app"> 133 <header> 134 <div class="blog-masthead"> 135 <div class="container"> 136 <nav class="nav"> 137 <a class="nav-link active" href="#">Home</a> 138 </nav> 139 </div> 140 </div> 141 </header> 142 143 <main role="main" class="container"> 144 145 <div class="row"> 146 147 <div class="col-sm-12 blog-main"> 148 149 <div class="blog-post"> 150 <h2 class="blog-post-title">Realtime Comments With Pusher</h2> 151 <p class="blog-post-meta">January 1, 2018 by <a href="#">Jordan</a></p> 152 <p>This blog post shows a few different types of content that's supported and styled with Bootstrap. Basic typography, images, and code are all supported.This blog post shows a few different types of content that's supported and styled with Bootstrap. Basic typography, images, and code are all supported 153 </p> 154 <div class="comment-section"> 155 <form class="form-signin"> 156 <h5 class="comment">Comment</h5> 157 <input type="username" ref="username" class="form-control" placeholder="John Doe" required autofocus> 158 <input type="email" ref="email" class="form-control" placeholder="Johndoe@gmail.com" required> 159 <textarea ref="comment"></textarea> 160 <button class="btn btn-lg btn-primary" @click.prevent="sendComment" type="submit">Comment</button> 161 </form> 162 <br> 163 <div id="comment-section" v-for="comment in comments"> 164 <div> 165 <img src="http://merritos.com/img/team/maleTeam.jpg" width="65px" height="65px"> 166 <p> {{comment.name}} < {{comment.email}} ></p> 167 <hr> 168 </div> 169 <p style="color:black">{{comment.comment}}</p> 170 </div> 171 </div> 172 </div> 173 </div> 174 175 </div> 176 177 </main> 178 179 <footer class="blog-footer"> 180 <p><a href="#">Back to top</a></p> 181 </footer> 182 183 </div> 184 </body> 185 </html>
Now in the same file, paste the following code before the closing body tag of the HTML:
1<script> 2 var app = new Vue({ 3 el: '#app', 4 data: { 5 comments : [] 6 }, 7 created: function() { 8 axios.get('/comments').then(response => { 9 this.comments = response.data.items ? response.data.items : [] 10 }) 11 }, 12 methods: { 13 sendComment: function(index) { 14 let comment = { 15 name: this.$refs.username.value, 16 email: this.$refs.email.value, 17 comment: this.$refs.comment.value 18 } 19 20 axios.post('/comment', comment).then(response => { 21 this.$refs.username.value = '', 22 this.$refs.email.value = '', 23 this.$refs.comment.value = '' 24 }) 25 } 26 } 27 }) 28 </script>
Above we have the Vue.js code for our application and this is a summary of what it does:
- We instantiate a comments array that will hold all the available comments.
- In the
created()method, we use Axios to pull in all the comments available from the API and store it in thecommentsarray. - In the
sendCommentmethod, we send a request to the API to create a newcomment.
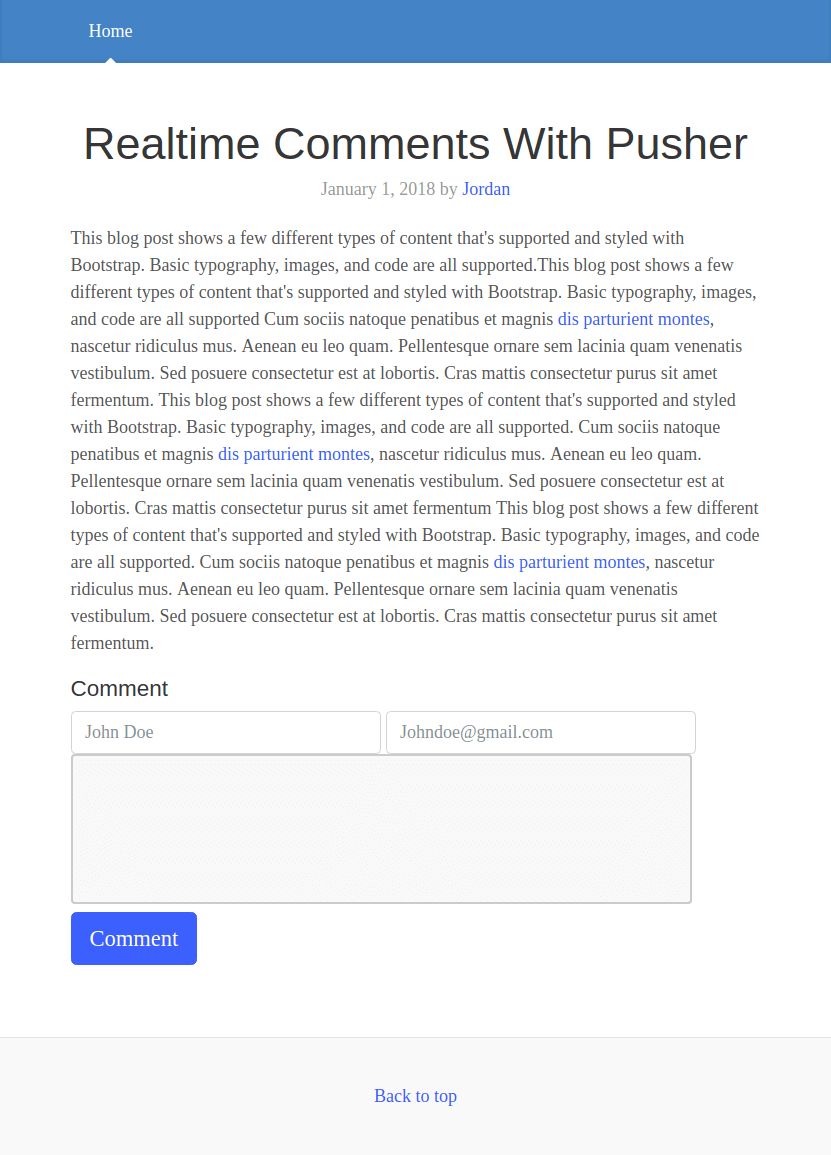
We can build our application at this stage and visit http://localhost:9000, we should see this:
$ go run comments.go
Our application should display like this:
Making comments display in realtime
The next thing we need to do is make sure the comments are displayed in realtime. To do this, we need to trigger an event every time a new comment is added. We will do this in the backend using the Pusher Go library.
To pull in the Pusher Go library run the following command:
$ go get github.com/pusher/pusher-http-go
Next let’s import the library. In our models.go file do the following in the imports statement:
1package models 2 3 import ( 4 // [...] 5 6 pusher "github.com/pusher/pusher-http-go" 7 )
In the same file, before the type definition, paste in the following code:
1// [...] 2 3 var client = pusher.Client{ 4 AppId: "PUSHER_APP_ID", 5 Key: "PUSHER_APP_KEY", 6 Secret: "PUSHER_APP_SECRET", 7 Cluster: "PUSHER_APP_CLUSTER", 8 Secure: true, 9 } 10 11 // [...]
Here, we have initialized the Pusher client using the credentials from our earlier created app.
⚠️ Replace
PUSHER_APP_*keys with your Pusher app credentials.
Next, let’s trigger an event every time a comment is saved to the database. Replace the PushComment function with the following code:
1func PushComment(db *sql.DB, name string, email string, comment string) (int64, error) { 2 sql := "INSERT INTO comments(name, email, comment) VALUES(?, ?, ?)" 3 stmt, err := db.Prepare(sql) 4 if err != nil { 5 panic(err) 6 } 7 8 defer stmt.Close() 9 10 result, err2 := stmt.Exec(name, email, comment) 11 if err2 != nil { 12 panic(err2) 13 } 14 15 newComment := Comment{ 16 Name: name, 17 Email: email, 18 Comment: comment, 19 } 20 21 client.Trigger("comment-channel", "new-comment", newComment) 22 return result.LastInsertId() 23 }
In this newer version of the function we create a newComment object that holds information for the last comment that was saved to the database. Whenever a new comment is created, we will send it to the Pusher channel comment-channel to be triggered on the event new-comment.
Displaying data in realtime on the client To receive comments we have to register the Pusher JavaScript Client in our frontend code. Add this line of code inside the head tag of our HTML in the index.html file:
<script src="https://js.pusher.com/4.1/pusher.min.js"></script>
Next we will register a Pusher instance in the created() life cycle hook:
1created: function() { 2 3 const pusher = new Pusher('PUSHER_APP_KEY', { 4 cluster: 'PUSHER_APP_CLUSTER', 5 encrypted: true 6 }); 7 8 const channel = pusher.subscribe('comment-channel'); 9 10 channel.bind('new-comment', data => { 11 this.comments.push(data) 12 }); 13 14 // [...] 15 }
⚠️ Replace the
PUSHER_APP_*keys with the credentials for your Pusher application.
In the code above, we are creating a Pusher instance and then subscribing to a channel. In that channel we are listening for the new-comment event.
Now we can run our application:
$ go run comments.go
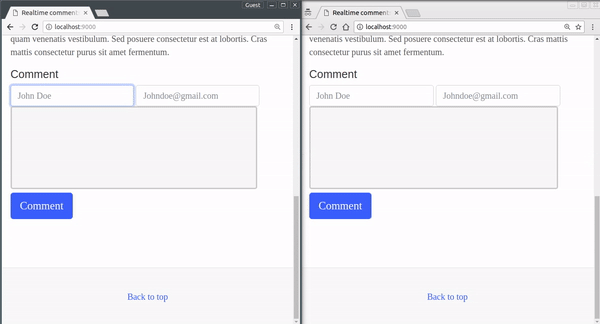
We can point a web browser to this address http://localhost:9000 and we should see the application in action:
Conclusion
In this article, we looked at how to build a realtime comment system using Go, Vue.js, and Pusher Channels. The source code to the application is available on GitHub.


© 2024 Pusher Ltd. All rights reserved.
Pusher Limited is a company registered in England and Wales (No. 07489873) whose registered office is at MessageBird UK Limited, 3 More London Riverside, 4th Floor, London, United Kingdom, SE1 2AQ.